
Tasty Glazed Chicken Tenders are exactly what you need when you’re craving something crispy, juicy, sweet, and savory all at once. Imagine golden chicken strips with a crunchy panko coating, covered in a glossy honey garlic glaze that clings to every bite. Sounds delicious, right? The best part is that you don’t need complicated ingredients or hours in the kitchen to make them. With simple pantry staples, fresh garlic, honey, and a few seasonings, you can prepare a satisfying chicken dinner in about 35 minutes. Whether you’re making a quick family dinner, preparing game-day snacks, or looking for something different to serve guests, these chicken tenders are guaranteed to bring plenty of flavor to the table.
Why You’ll Love These Tasty Glazed Chicken Tenders
There are plenty of ways to prepare chicken tenders, but adding a homemade sweet and savory glaze makes this version particularly delicious. You get the familiar crunch of classic breaded chicken with an extra layer of flavor from honey, garlic, butter, and soy sauce.
The Perfect Combination of Crispy and Sticky
The magic of these Tasty Glazed Chicken Tenders comes from the contrast between the crunchy coating and the smooth glaze. Panko breadcrumbs create a light, crisp exterior, while the seasoned chicken stays juicy and tender inside.
Meanwhile, the homemade glaze brings everything together. Honey provides natural sweetness, soy sauce adds a savory depth, and fresh garlic gives the sauce its irresistible aroma. A little apple cider vinegar balances the sweetness, so the finished dish doesn’t taste overly sugary.
And here’s something important: the glaze should coat the chicken without completely drowning its crispy exterior. That’s how you get delicious flavor while keeping some of that satisfying crunch.
A Quick Dinner That Feels Special
You don’t need a special occasion to prepare these chicken tenders. In fact, they’re simple enough for busy weeknights but flavorful enough to serve when friends or family come over.
The preparation is straightforward, too. First, season the chicken. Next, coat each piece with flour, egg, and panko breadcrumbs. Then fry until golden before tossing everything in the warm honey garlic glaze.
Because the ingredients are easy to find, you can prepare this recipe without making a special trip to the grocery store.
Here are a few reasons to keep this recipe in your regular dinner rotation:
- Easy ingredients: Most ingredients are everyday pantry staples.
- Family-friendly flavor: The honey garlic combination offers sweetness and savory flavor without overwhelming heat.
- Customizable: You can add chili flakes, sesame seeds, or extra garlic.
- Versatile serving options: Serve the tenders with potatoes, vegetables, rice, or a fresh salad.
- Great for sharing: Cut them into smaller pieces and serve as an appetizer or party snack.
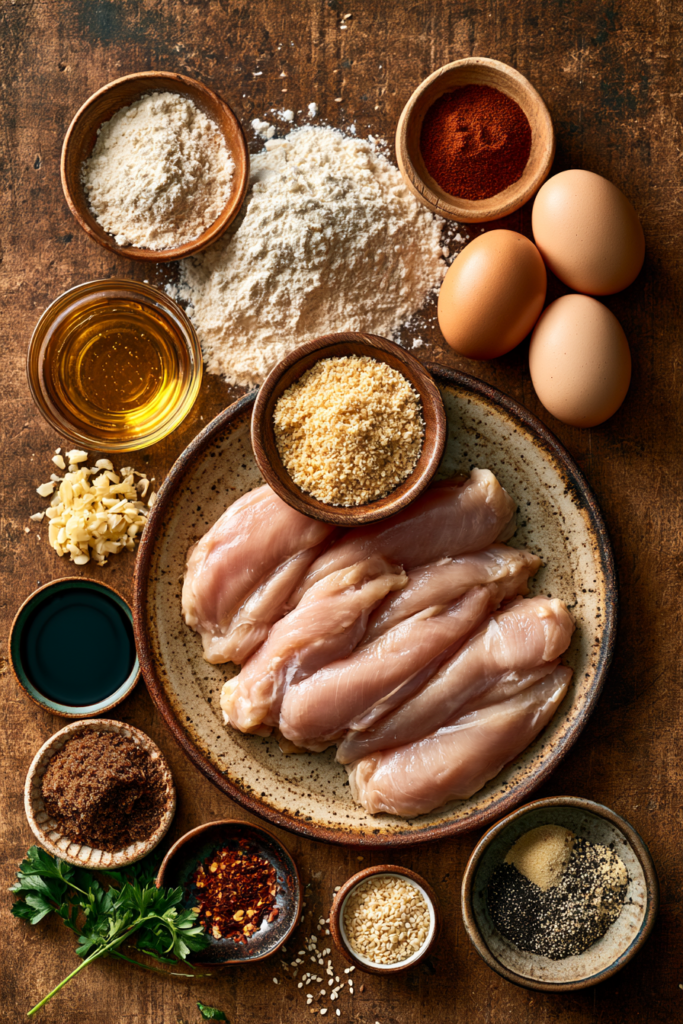
Ingredients for Sweet and Savory Glazed Chicken Tenders
One of the best things about this recipe is that every ingredient has a purpose. The chicken provides a juicy center, the seasoned breadcrumb coating creates crunch, and the glaze adds the sweet and savory finish.
What You’ll Need for the Crispy Chicken
| Ingredient | Amount | Purpose |
|---|---|---|
| Chicken tenders | 1½ lbs | Juicy, tender protein |
| All-purpose flour | 1 cup | Helps the coating stick |
| Panko breadcrumbs | 1 cup | Creates a crispy exterior |
| Eggs | 2 large | Binds the breadcrumbs |
| Garlic powder | 1 tsp | Adds savory flavor |
| Paprika | 1 tsp | Adds warmth and color |
| Onion powder | ½ tsp | Adds depth |
| Black pepper | ½ tsp | Adds gentle seasoning |
| Salt | ½ tsp | Enhances flavor |
| Vegetable oil | As needed | For frying |
Chicken tenders: Use fresh or completely thawed chicken tenders. If you have boneless, skinless chicken breasts instead, simply slice them into evenly sized strips.
Panko breadcrumbs: These breadcrumbs are especially useful when you want a light, crunchy coating. Regular breadcrumbs can work, but the texture will be slightly different.
Eggs and flour: This classic breading combination helps the panko adhere evenly to the chicken. For the best results, shake off excess flour before dipping the chicken into the egg mixture.
Seasonings: Garlic powder, paprika, onion powder, salt, and black pepper provide a flavorful foundation without competing with the glaze.
Ingredients for the Honey Garlic Glaze
The glaze is what makes these chicken tenders stand out. It’s buttery, glossy, slightly tangy, and packed with garlic flavor.
| Ingredient | Amount | Purpose |
|---|---|---|
| Honey | ⅓ cup | Natural sweetness |
| Low-sodium soy sauce | 3 tbsp | Savory, salty flavor |
| Fresh garlic | 3 cloves | Aromatic flavor |
| Unsalted butter | 2 tbsp | Richness and smoothness |
| Apple cider vinegar | 1 tbsp | Balances sweetness |
| Brown sugar | 1 tbsp | Adds caramel-like sweetness |
| Red pepper flakes | ½ tsp | Optional gentle heat |
| Cornstarch | 1 tsp | Thickens the glaze |
| Water | 1 tbsp | Mixes with cornstarch |
Honestly, fresh garlic makes a noticeable difference here. It gives the sauce a stronger, fresher flavor than garlic powder alone.
You can also adjust the sweetness according to your preference. If you prefer a more savory glaze, reduce the brown sugar slightly and add a little extra soy sauce. However, keep the honey because it gives the sauce its signature sticky consistency.
How to Make Tasty Glazed Chicken Tenders
Making these chicken tenders involves three simple stages: preparing the chicken, frying until crispy, and creating the honey garlic glaze. Although each stage is easy, a few small details make a big difference in the final texture.
Prepare and Season the Chicken
Start by patting the chicken tenders dry with paper towels. Removing excess moisture helps the breading adhere properly and encourages a crispier exterior.
Next, place the chicken in a bowl and season it with garlic powder, paprika, onion powder, salt, and black pepper. Toss everything together until the seasonings cover the chicken evenly.
If your chicken tenders vary significantly in size, consider cutting the larger pieces into smaller strips. This helps them cook more evenly.
Prepare three shallow bowls for breading:
- Add the all-purpose flour to the first bowl.
- Whisk the eggs in the second bowl.
- Place the panko breadcrumbs in the third bowl.
Now coat each chicken strip in flour, dip it into the beaten eggs, and finish with panko breadcrumbs. Press gently so the crumbs stick to the surface.
Place the coated chicken on a plate or wire rack while you prepare the oil.
Fry Until Golden and Crispy
Pour approximately ½ inch of vegetable oil into a large skillet. Heat it over medium heat until the oil reaches approximately 350°F (175°C).
Carefully add a few chicken tenders at a time. Avoid overcrowding the skillet because too many pieces can lower the oil temperature and make the coating greasy.
Fry each piece for approximately 3–4 minutes per side, adjusting the cooking time according to its thickness. The coating should become golden brown and crisp.
Once cooked, transfer the chicken to a wire rack to drain excess oil.
Here’s a useful tip: A wire rack allows air to circulate around the chicken, helping the bottom stay crisp. Paper towels can absorb excess oil, but they may trap steam underneath the tenders.
Always check the thickest part of the chicken with a food thermometer. Chicken should reach an internal temperature of 165°F (74°C) before serving.
Make the Sweet and Savory Glaze
While the chicken rests, prepare the honey garlic glaze.
Place a small saucepan over medium-low heat and melt the butter. Add the minced garlic and cook for approximately 30 seconds, stirring frequently. You want the garlic fragrant, not browned.
Next, add the honey, soy sauce, apple cider vinegar, brown sugar, and red pepper flakes if using.
Stir everything together and allow the mixture to simmer gently for 2–3 minutes.
In a small bowl, combine the cornstarch with one tablespoon of water. Mix until smooth, then slowly pour the slurry into the saucepan while stirring.
Continue stirring until the glaze thickens and develops a beautiful glossy appearance.
Don’t let the sauce boil aggressively. A gentle simmer gives the ingredients time to combine without making the glaze too thick.
Coat and Serve the Chicken
Remove the saucepan from the heat and add the crispy chicken tenders.
Gently toss each piece until the honey garlic glaze covers the chicken evenly. Alternatively, brush the glaze over the tenders if you want to preserve more of the crispy breadcrumb texture.
Arrange the chicken on a serving platter and finish with sesame seeds or freshly chopped parsley.
Serve immediately while the coating is still warm and the glaze is glossy.

Tips, Variations, Serving Ideas and FAQs
Once you’ve mastered the basic recipe, there are plenty of ways to customize these Tasty Glazed Chicken Tenders. You can change the cooking method, adjust the sweetness, or experiment with different sides.
Helpful Tips for the Best Results
1. Don’t skip drying the chicken. Excess moisture can prevent the flour and breadcrumbs from sticking properly. Pat each piece dry before seasoning.
2. Use panko for extra crunch. Panko breadcrumbs create a lighter texture than many traditional breadcrumbs. For even more texture, press them gently onto the chicken.
3. Maintain the correct oil temperature. Oil that’s too cool can produce greasy chicken, while oil that’s too hot can brown the coating before the center cooks. Aim for approximately 350°F.
4. Fry in batches. Give each chicken tender enough space. This helps maintain a consistent oil temperature and encourages even browning.
5. Prepare the glaze separately. Never pour the sauce directly into the frying pan. Making it separately gives you better control over its consistency and prevents the crispy coating from becoming soggy too early.
6. Toss just before serving. For maximum crunch, coat the tenders immediately before bringing them to the table.
7. Adjust the flavor. Add extra garlic for a stronger savory taste or red pepper flakes for a little heat.
Easy Variations to Try
The original honey garlic glaze is delicious, but you can easily change the flavor to suit your preferences.
| Variation | What to Change | Flavor |
|---|---|---|
| Spicy Honey Garlic | Add extra chili flakes or hot sauce | Sweet and spicy |
| Honey BBQ | Replace some honey with barbecue sauce | Smoky and sweet |
| Lemon Garlic | Add fresh lemon juice and zest | Bright and tangy |
| Sesame Garlic | Add toasted sesame oil and sesame seeds | Rich and nutty |
| Extra Garlic | Add one or two extra garlic cloves | Bold and savory |
If you enjoy chicken recipes with a little more flavor and crunch, try these Crispy Hot Honey Lemon Parmesan Chicken Cutlets with Mixed Herbs. They’re another delicious way to bring crispy chicken and a sweet, flavorful finish to your dinner table.
What to Serve with Glazed Chicken Tenders
These chicken tenders are flavorful enough to enjoy on their own. However, pairing them with the right sides turns them into a complete and satisfying meal.
Here are some delicious serving ideas:
- Mashed potatoes: Creamy mashed potatoes balance the crispy coating and sticky glaze.
- Roasted vegetables: Broccoli, carrots, zucchini, and green beans add freshness and color.
- French fries: A classic pairing that’s especially popular for casual family dinners.
- Steamed rice: Plain rice absorbs some of the delicious honey garlic sauce.
- Fresh salad: A crisp green salad with a light vinaigrette balances the richness of the chicken.
- Sweet potato casserole: For a comforting holiday-inspired meal, serve the tenders alongside this Sweet Potato Casserole with Pecan Topping.
You can also serve smaller chicken pieces on a sharing platter with dipping sauces. Ranch, honey mustard, and extra garlic sauce are all excellent choices.

Frequently Asked Questions
Can I make Tasty Glazed Chicken Tenders in an air fryer?
Absolutely! Arrange the breaded chicken in a single layer in an air fryer basket. Lightly spray the coating with cooking oil and cook at 400°F (200°C) for approximately 10–15 minutes, turning halfway through. Cooking time depends on the thickness of the chicken and your appliance. Check that the internal temperature reaches 165°F (74°C). Prepare the glaze separately and toss or brush it over the cooked chicken just before serving.
How do I keep chicken tenders crispy after adding the glaze?
The trick is to avoid soaking the chicken in too much sauce. Instead, lightly toss the tenders or brush the glaze over them. Also, wait until just before serving to add the glaze. This helps preserve the crunchy breadcrumb coating for longer.
Can I prepare the chicken ahead of time?
Yes. You can season and bread the chicken a few hours ahead. Arrange the coated pieces in a single layer, cover, and refrigerate until you’re ready to cook. For food safety, keep raw chicken refrigerated and cook it thoroughly before serving.
Can I use chicken breast instead of chicken tenders?
Definitely. Boneless, skinless chicken breasts work perfectly. Slice them into strips of similar thickness so they cook evenly. The preparation and breading process remain exactly the same.
How should I store leftover glazed chicken tenders?
Allow leftovers to cool, then transfer them to an airtight container and refrigerate promptly. For the best quality, enjoy them within 3–4 days. Reheat in an oven or air fryer to help restore some crispiness. The glaze may soften the coating during storage, so the texture won’t be quite the same as freshly cooked chicken.
Can I freeze these chicken tenders?
Yes. For better results, freeze the cooked, unglazed tenders separately from the glaze. Arrange the chicken in a single layer until frozen, then transfer it to a freezer-safe container. Thaw safely in the refrigerator and reheat until thoroughly hot before adding freshly prepared glaze.
Final Thoughts
These Tasty Glazed Chicken Tenders are proof that a simple chicken dinner can be incredibly satisfying. Between the crunchy golden coating, juicy chicken, and sticky honey garlic glaze, every bite brings something delicious to the table.
And the best part? You can easily customize the recipe to make it sweeter, spicier, or more garlicky depending on what you enjoy.
Serve them with crispy potatoes, a fresh salad, or your favorite vegetables for a complete meal. They’re also fantastic for casual gatherings, weekend lunches, and family dinners when you want something everyone can enjoy.
Print
Tasty Glazed Chicken Tenders – Sweet, Savory & Irresistibly Crispy
- Total Time: 35 mins
- Yield: 4 servings
Description
Crispy golden chicken tenders coated in a sticky honey garlic glaze with the perfect balance of sweet, savory, and tangy flavors. An easy 35-minute dinner that’s perfect for family meals, appetizers, or game-day gatherings.
Ingredients
1½ lbs boneless, skinless chicken tenders
1 cup all-purpose flour
1 cup panko breadcrumbs
2 large eggs
1 tsp garlic powder
1 tsp paprika
½ tsp onion powder
½ tsp black pepper
½ tsp salt
Vegetable oil, for frying
For the Honey Garlic Glaze:
⅓ cup honey
3 tbsp low-sodium soy sauce
3 cloves garlic, minced
2 tbsp unsalted butter
1 tbsp apple cider vinegar
1 tbsp brown sugar
½ tsp red pepper flakes (optional)
1 tsp cornstarch
1 tbsp water
Instructions
1. Pat the chicken tenders dry with paper towels and season with salt, black pepper, paprika, garlic powder, and onion powder.
2. Prepare three shallow bowls with flour, beaten eggs, and panko breadcrumbs.
3. Coat each chicken tender in flour, dip into the beaten eggs, then press into the panko breadcrumbs until evenly coated.
4. Heat approximately ½ inch of vegetable oil in a large skillet over medium heat until it reaches about 350°F (175°C).
5. Fry the chicken tenders in batches for approximately 3–4 minutes per side until golden brown and cooked through, reaching an internal temperature of 165°F (74°C).
6. Transfer the cooked chicken to a wire rack to drain excess oil.
7. In a small saucepan over medium-low heat, melt the butter and cook the minced garlic for about 30 seconds until fragrant.
8. Add honey, soy sauce, apple cider vinegar, brown sugar, and red pepper flakes. Stir and simmer gently for 2–3 minutes.
9. Mix cornstarch with water in a small bowl until smooth, then add the mixture to the saucepan while stirring.
10. Continue stirring until the glaze thickens and becomes glossy.
11. Remove the glaze from the heat and gently toss the crispy chicken tenders in the sauce until evenly coated.
12. Garnish with sesame seeds or fresh parsley if desired and serve immediately.
Notes
Use panko breadcrumbs for the crispiest coating.
Avoid overcrowding the skillet when frying to maintain the oil temperature.
Use a wire rack instead of paper towels to help keep the chicken crispy.
For extra heat, add more red pepper flakes or a little hot sauce to the glaze.
For maximum crispiness, toss the chicken in the glaze just before serving.
Air fryer option: Cook breaded chicken at 400°F (200°C) for approximately 10–15 minutes, turning halfway through, until the internal temperature reaches 165°F (74°C).
Store leftovers in an airtight container in the refrigerator for 3–4 days.
- Prep Time: 15 mins
- Cook Time: 20 mins
- Category: Dinner, Main Course, Appetizer
- Method: Pan-Frying
- Cuisine: American